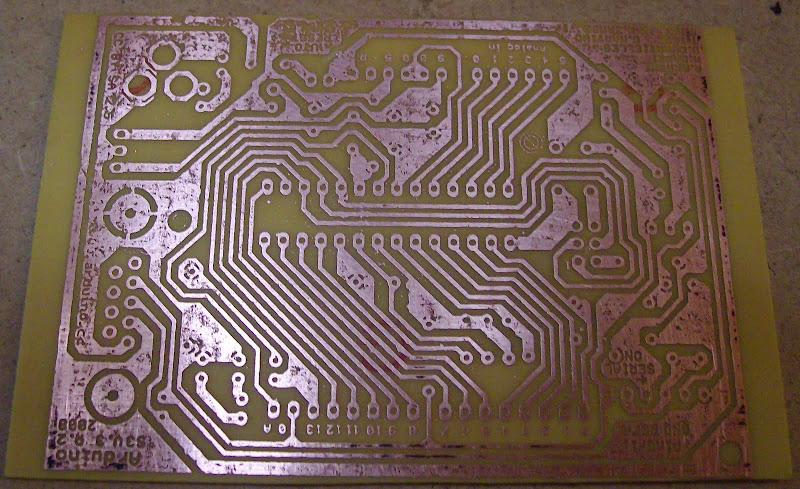
I found this single sided board Arduino Single-Sided Serial Board (version 3) as I have the old chip from my Arduino Decimila that's now been converted to a Arduino Demiglove I could do with a new board for the old chip.
I have tried all kinds of colour photo paper in the past followed several different peoples blogs on how you iron on your picture the soak it in water and gently rub the paper off..
Well no matter how careful you are Gently rubbing the toner It comes off leaving areas of track that get over etched with bits of track missing.
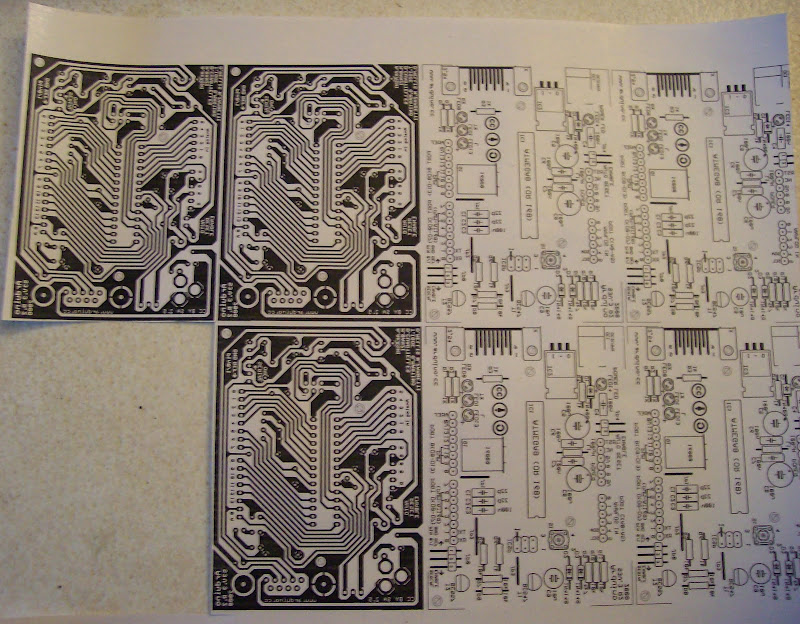
So reading about this other method that sounded like it might work I though I would give it a try to day as I had used some Computer labels I had the backing sheet to try out.
What you do is you print on the backing sheet of the computer labels.
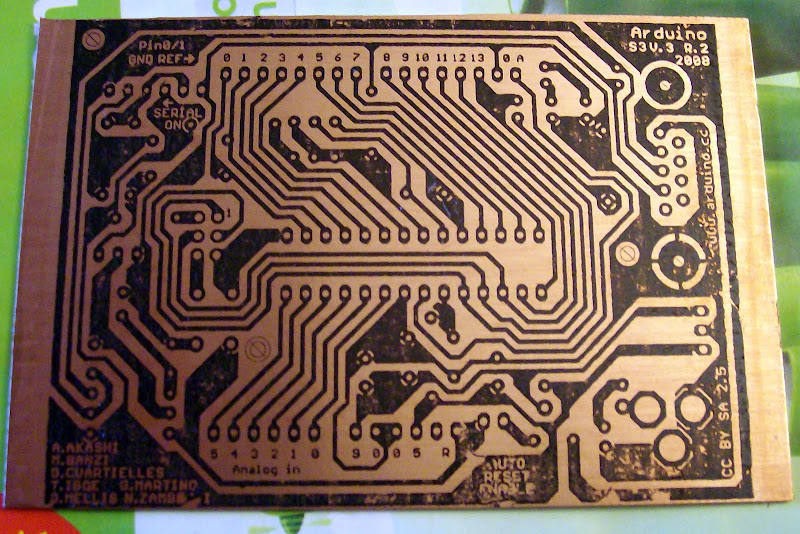
I have not had any success with laser Iron on transfer. I was not as pedantic in my cleaning of the board just a quick scrub with a green plastic scourer.
Then I Ironed on the printed image on to the board.. leaving the iron on for about 1-2 mins no rubbing just resting on the label removed the iron. Tried peeling the corner up - to my surprise every part of the toner image was left on the board.
A new use for Arnie the £10 PID control HOB keeping the etch ant warm to make the etching quicker. I set the P.I.D. controller to 50C put a metal case on the hob then the plastic etch tray I found I needed to cover the tray to try to keep the heat in eventually getting 40C popped the board in to etch went away and left it etching wile I set up the Spline cutter.
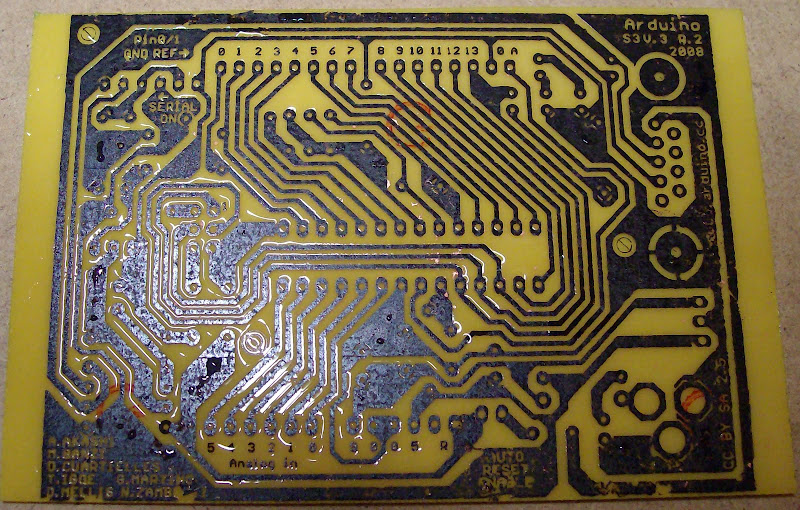
I took it out slightly too soon as there are a few little patches that are under etched but it is by far better than any previous toner transfer etch result I can see that this board will work It will not need any track repairs.
The labels I have are the cheapest ones you can get from a pound shop so I think any kind will work just fine.
Very very pleased with this result as I have several CCT designs I want to try ~ I hate using the non solder prototyping boards even though I have just bought my first one. I prefer to go from design to board as it has always been the fastest route to have a working demo board to get funding from Directors or customers to start a new project.
PS my laser toner is on its last legs as well I need to put a new one in.. I have one but just want to get every last drop out of the current one first. The toner on the board was a devil of a job to get off and nail varnish remover did not remove it so it was scrubbing with the same old green plastic scourer to get the toner off.
18 comments:
That looks a good method and a nice result. Have your come across the etching method using a sponge soaked in FeCl rather than a bath. Apparently it is much faster and you can see the tracks develop and concentrate on the areas that need it.
check out http://members.optusnet.com.au/eseychell/PCB/etching_CuCl/index.html for an etchant that turns the etched copper into more etchant!
Nophead
Yes it worked nicely.
No I havent seen that method.
so you wipe the board then wait as t etches Re wiping the bits that need more?
Back in the day I wanted a bubble etching bath as they were quick.
Triffid hunter.
Thank you that look very interesting i'v book marked it.
I used FeC the anhydrous sort that conveniently chemically preheated the water during my apprenticeship.
This stuff is not ferric its sodium persulphate from Maplin.
Grinning as I read the details that say it lasts for 4 to 8 weeks. Mine was mixed 2 years ago.. it still works OK..
You can see by the colour it has a fair bit of copper in it thou.
I still have an unused pack so I wont need to uy any more for a while.
I have used the copper chloride method for the last two boards and it worked great.
I used brick acid (builders merchants) and peroxide (6% from a chemists) to mix up a starter batch, very cheap indeed.
BTW You don't need to get all of the paper off the board. The etchant usually soaks through the odd tiny wisp or two. Scrubbing at the board too much usually depletes the toner as well. I have found it to be a case of rub gently with finger tips but stop as soon as enough paper is removed.
That looks pretty good. It is the same board I first made too(that was more than a square inch or so).
What really helped me out was getting a cheap laminating machine instead of using an iron. Just run it thru a few times till its too hot to hold.
Also, I switched to the copper chloride etchant a while ago and it does work great.
AK47
Just use label backing next time no need to get your fingers wet.
Its just Iron, peel, etch, scrub drill.
Oh and you can Iron and peel the Silk screen on too.
Still avoiding spending money that I don't have so will stay with sodium persulphate till it stops working!
I haven't tried CNC ing a PCB yet.
I have etched solid copper sheet with line drawings before.
Using photo-resist, negative Film and UV bulbs followed by FeC bath.
The copper was mounted on an Oak plinth and presented to visitors or those retiring.
:-) Nice job
It sounds like backing paper is probably worth a try.
I used the 'dabbing' method - a small tray of etchant, a kitchen roll square, and dabbed on plenty of liquid holding the PCB in my *gloved* hand. Messier, but etched reasonably quickly and seemed to work OK.
I've seen the laminator tip elsewhere on the web - one of the commercial companies will sell you some 'special' transfer paper and a laminator for doing this. I've got one upstairs I will try next time.
DaveR
I have done lot of board using this method.
My problems with it:
- timeconsuming
- I could only made single-sided boards reliably. Etching the other side had always 1-2mm offset...:-(
So turning any board into a single-sided version in KiCAD takes *ages*. Really.
I have developed single-sided version of the stepper-driver board like 2 years ago. It was for the old one.
Are you really to modify the stepper driver v2.3 pcb layout to single-sided version?
Best regards,
Laszlo
laszlo k
I have 7 working 2.3 stepper controllers so was not thinking of making a single sided version.
I have a collection of other Allegro micro stepping chips that I want to try out play with.
I may try etching my own board or just milling an adaptor board with 0.1 headers to the SMT chip pins as the SMT pitches are tiny.
38 years ago I made double sided boards with hand pored photo resist using a jig that held both negatives in position while you exposed the board to UV ~ developed the board then etched it.
So I think its possible to to do double sided this way you will just need a jig to position the prints on the board before Ironing or laminating them on.
I am a beginner at Ki-cad so I don't know how to do very much yet.
The old way of photo resisting a board was. Clean and dry both sides of the board.
Pour photo resit on one side of the board leave for 20 mins to dry. Pour photo resit on the other side of the board leave for 20 mins to dry this was done in a dark room with a red light. This was all done using those old fasioned timers that you now see used in chess games.
I've been using toner transfer for a lot of stuff lately. I use it to transfer text/images onto things like acrylic sheets or metal project cases, as well as PCBs. I've had really good luck with inkjet photo paper, but since it's expensive, I've been experimenting with other materials lately. Most recently I've been using common kitchen wax paper. This works fairly well, except for the occasional crinkle in the paper when you're printing. I'm planning to try some sort of reusable backing before I send the sheet through. I use the ferric chloride + sponge method currently, but I'm running low so I purchased a bottle of muriatic acid so I'll be trying that soon.
Also, I've found that with boards over a few square inches, pre-heating the board goes a long way.
I use holes and pins to line up top and bottom side transfers.
http://aka47.adsl24.co.uk/serendipity/index.php?/pages/compside.html
Commercial board houses put holes in the board and use pins or studs to get the registration correct.
the best paper ive found for toner transfer is by Hamermill its Color laser Gloss paper, 32 lb weight glossy on both sides. # 16311-0
comes in 300 sheet packs, ive done boards with tssop pads and very fine traces. and you can tell when the toner has fused onto the board because you can see it through the paper.
also try pre-etching your board for a few seconds then wash and dry. it makes the toner grab the board. Rob in New Hampshire.
Hmmm pre-etching the board there is a something I had no thought of I will try that next time. Thank you.
I've been trying to use various kinds of media for toner transfer - all of which have certainly not been good enough so far!
* Glossy Paper has resulted in solid, transfers but they are rough and splattered.
* Plain Ink Jet Paper (80gsm) results in neat, but patchy transfers.
* Acetate Transparencies have resulted in patchy, and smoothly smeared transfers.
The problem is that in various TT method articles the authors claim various kinds of paper work best, but the paper is usually specified as a particular manufacturer's item from a particular supplier, which isn't particularly replicable.
Instead, I believe we need to know objectively the degree to which various papers 'work' in terms of resolution and coverage, independently of the manufacturer. Then we need to determine the actual paper characteristics, at the moment, it's all ad-hoc.
The printer label paper sounds interesting, but does the author really mean we should buy printer label paper and then rip off the labels? S/he also doesn't specify whether the waxy or matt side is to be used.
Cheers from Julian Skidmore (Stripes open-source Java stripboard designer author).
Great post! The fact that you means someone is reading and liking it! Congrats!That’s great advice.
Spline Hobs
Post a Comment