For those in the UK/US taking an ASDA/Wal-Mart Blue milk bottle top filled with poly morph/Capa creates a Z pulley with the correct pitch of gripper plastic to mate with the RRRF drive belt (LL025XML). Complete with a dimple in the middle to drill the 8mm hole for the Z axis. I've not finished experimenting but it looks very good.
Tools used.
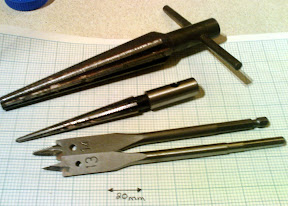

Design change for X and Y gears so all are made in simple ply mould for all three by making the drive shaft from 6mm studding.
By using a short length of 8mm Aluminium tube as a bearing insert to fit the 6mm studding in a standard skate bearing. The new 6mm size drive can replace the 8mm drive shaft on Repstrap Darwin
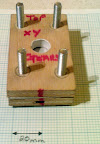
Mould assembly


The XY belt length for mould is 0.1mm x 400steps = 40mm.
Cut 40mm of belt starting at a tooth & ending just before a tooth thus giving 20 teeth.
The hole size required to make the mould is (40mm/3.142) + 2*0.64 mm [belt height] = 14mm.
I took 2 pieces of ply 75mm X 44mm held them together drilled a 6mm hole through the middle put a 6mm nut and bolt through them marked the sides with marker pen. Drilled 6mm holes in each corner 15mm in from each edge. I took the ply apart marking the tops with felt pen... I took the top piece and used a 13mm wood bit to drill out the middle hole (use a 14mm drill if you have one.)
Using my big tapered reamer and the 40mm of belt I adjusted the hole for a perfect fit. I sanded all of the internal edges of the new hole fitted the belt. This made great gears but when I drilled out the drive shaft hole it was slightly off centre. So off to B&Q to get a 14mm wood bit & remade the Top plate. I also decided to make an Aluminium plate to go between the top and bottom ply plates to make a nice flat finish on the end of the gear. I found using a cheap friction style G clamp with a penny washer produced a better finish to the top of the gears. I used a 1 pint Christmas pudding bowl to heat the water to temperature in the microwave.

Filling the Bowl 3/4 pint of water & Micro waving for 2.5 mins in a 900w microwave gave the right temperature for the Polymorph. I found measuring a milk bottle top full of Polymorph was just right for making one gear.
I used a plastic fork to squish the Polymorph granules together and remove them from the hot water. Once drained you can handle the plastic (test it first as you don’t want to burn your puddys) push into the top of the mould level it off put penny washer on top and clamp down with G clamp leave for 10 mins remove clamp and washer. Un-bolt mould remove aluminium plate ensure polymorph has cooled to white colour re-bolt the ply parts flip mould over & drill 6mm hole un bolt mould pop the gear out carefully peeling of the length of belt you have one nice looking gear.
The first gear you make will pick up any wood dust so put the first gear to one side.
re-assemble and repeat this time the gear is perfect, so make 2 more.


The finished gears are a tight fit on threaded rod so screw the gears on. I put a washer on either side of each gear on the Y axis. The X axis can be fitted to the X stepper using supper glue and some force to fit it I adjusted the hole with a small tapered reamer first.

The milk bottle top gears have 64 teeth. The Z resolution remains at 1mm / 400steps =0.0025mm as this is governed by the thread of the drive shafts not the pulley size.
Lost posting recoverd...